Decreasing TTFB or Time To First Byte is one of the most important optimizations when it comes to web pages. TTFB means the time it takes for the backend to process the request. This is important because the initial TTFB directly affects how soon the client receives the initial HTML document that it can parse and then go on to fetch other resources. Because the initial request blocks fetching all other resources on the page, minimizing this delay is of utmost importance.

When working with dynamic database-driven websites, there’s only so much you can do to optimize the process of fetching all the necessary data from the database and external API’s and then building the page template in a programming language like PHP, Ruby or Node. This is why static websites are so appealing: you can simply serve a static HTML document with a web server with minimal delay.
With full page caching, you can get the same speed advantage with dynamic, database-driven websites. Instead of processing the request using a backend language every time a new request comes in, the static HTML or JSON response is saved into the filesystem and served from there for successive requests. Often the response is saved for several minutes. Only when the cache has been expired, a request is made again to the backend server and then cached for subsequent requests from users.
This can cause some problems with because users are now served stale content. If you update the content in the database, it can take several minutes for users to see. We can work around this problem by using microcaching: instead of minutes, we cache the content for seconds. This way, users will get fresh content almost immediately.
When caching is needed, many people will think of using Varnish. However, Varnish is a heavyweight tool and it’s somewhat hard to configure. Furthermore, Varnish does not support HTTPS. In many cases, you will need to run backend server such as Nginx, then Varnish and then Nginx again to do SSL termination. This can increase the server setup complexity a lot.
In addition to being a HTTP server, Nginx is also a capable cache that can be used in place of Varnish. Nginx supports both FastCGI caching mostly for PHP and HTTP caching for languages with their own web server, for example, Node. In this example, we are using the FastCGI caching but you can use the same configuration for HTTP caching by replacing the fastcgi_ prefix with proxy_.
What were are testing is a basic WordPress installation front page without any caching using ApacheBench with 1000 requests and 10 request concurrency. WordPress 4.8 is installed on a DigitalOcean droplet with 512mb of memory, ubuntu 16.04 OS and PHP 7. Here’s the Nginx configuration I’m using.
server {
    listen 80 default_server;
    listen [::]:80 default_server ipv6only=on;

    root /var/www/html;
    index index.php index.html index.htm;

    server_name example.com;

    location / {
        try_files $uri $uri/ /index.php$is_args$args;
    }

    error_page 404 /404.html;
    error_page 500 502 503 504 /50x.html;
    location = /50x.html {
        root /usr/share/nginx/html;
    }

    location ~ \.php$ {
        include snippets/fastcgi-php.conf;
        fastcgi_pass unix:/run/php/php7.0-fpm.sock;
    }
}
Now if we can add the following configuration to enable basic FastCGI caching. Please make sure the cache folder is writable by the web server process.
# Ignore cache control headers from upstream, don't enable this if you plan to control caching per-page from your application
fastcgi_ignore_headers Cache-Control Expires Set-Cookie;
# Specify cache path, cache memory zone, how long until old data gets purged from the cache and maximum cache size
fastcgi_cache_path /etc/nginx/cache levels=1:2 keys_zone=microcache:100m inactive=1y max_size=100m;
# A key that is used to uniquely identify a cached page
fastcgi_cache_key "$scheme://$host$request_method$request_uri";

server {
    listen 80 default_server;
    listen [::]:80 default_server ipv6only=on;

    root /var/www/html;
    index index.php index.html index.htm;

    server_name example.com;

    location / {
        #try_files $uri $uri/ =404;
        try_files $uri $uri/ /index.php$is_args$args;
    }

    error_page 404 /404.html;
    error_page 500 502 503 504 /50x.html;
    location = /50x.html {
        root /usr/share/nginx/html;
    }

    location ~ \.php$ {
        include snippets/fastcgi-php.conf;
        fastcgi_pass unix:/run/php/php7.0-fpm.sock;
    }

    # WordPress specific settings, don't cache logged in users or admin pages
    set $no_cache 0;

    if ( $http_cookie ~* "comment_author_|wordpress_(?!test_cookie)|wp-postpass_" ) {
        set $no_cache 1;
    }

    if ($request_uri ~* "/(wp-admin/|wp-login.php)")
    {
        set $no_cache 1;
    }

    # Don't cache or serve pages specified above
    fastcgi_cache_bypass $no_cache;
    fastcgi_no_cache $no_cache;

    # Select which cache to use
    fastcgi_cache microcache;
    # Cache successful responses for one second, you could also cache redirects here by adding status code 302!
    fastcgi_cache_valid any 1s;
    # Show cache status in HTTP headers, useful for debugging
    add_header X-Cache $upstream_cache_status;
}
When we run the benchmark, here are the numbers:
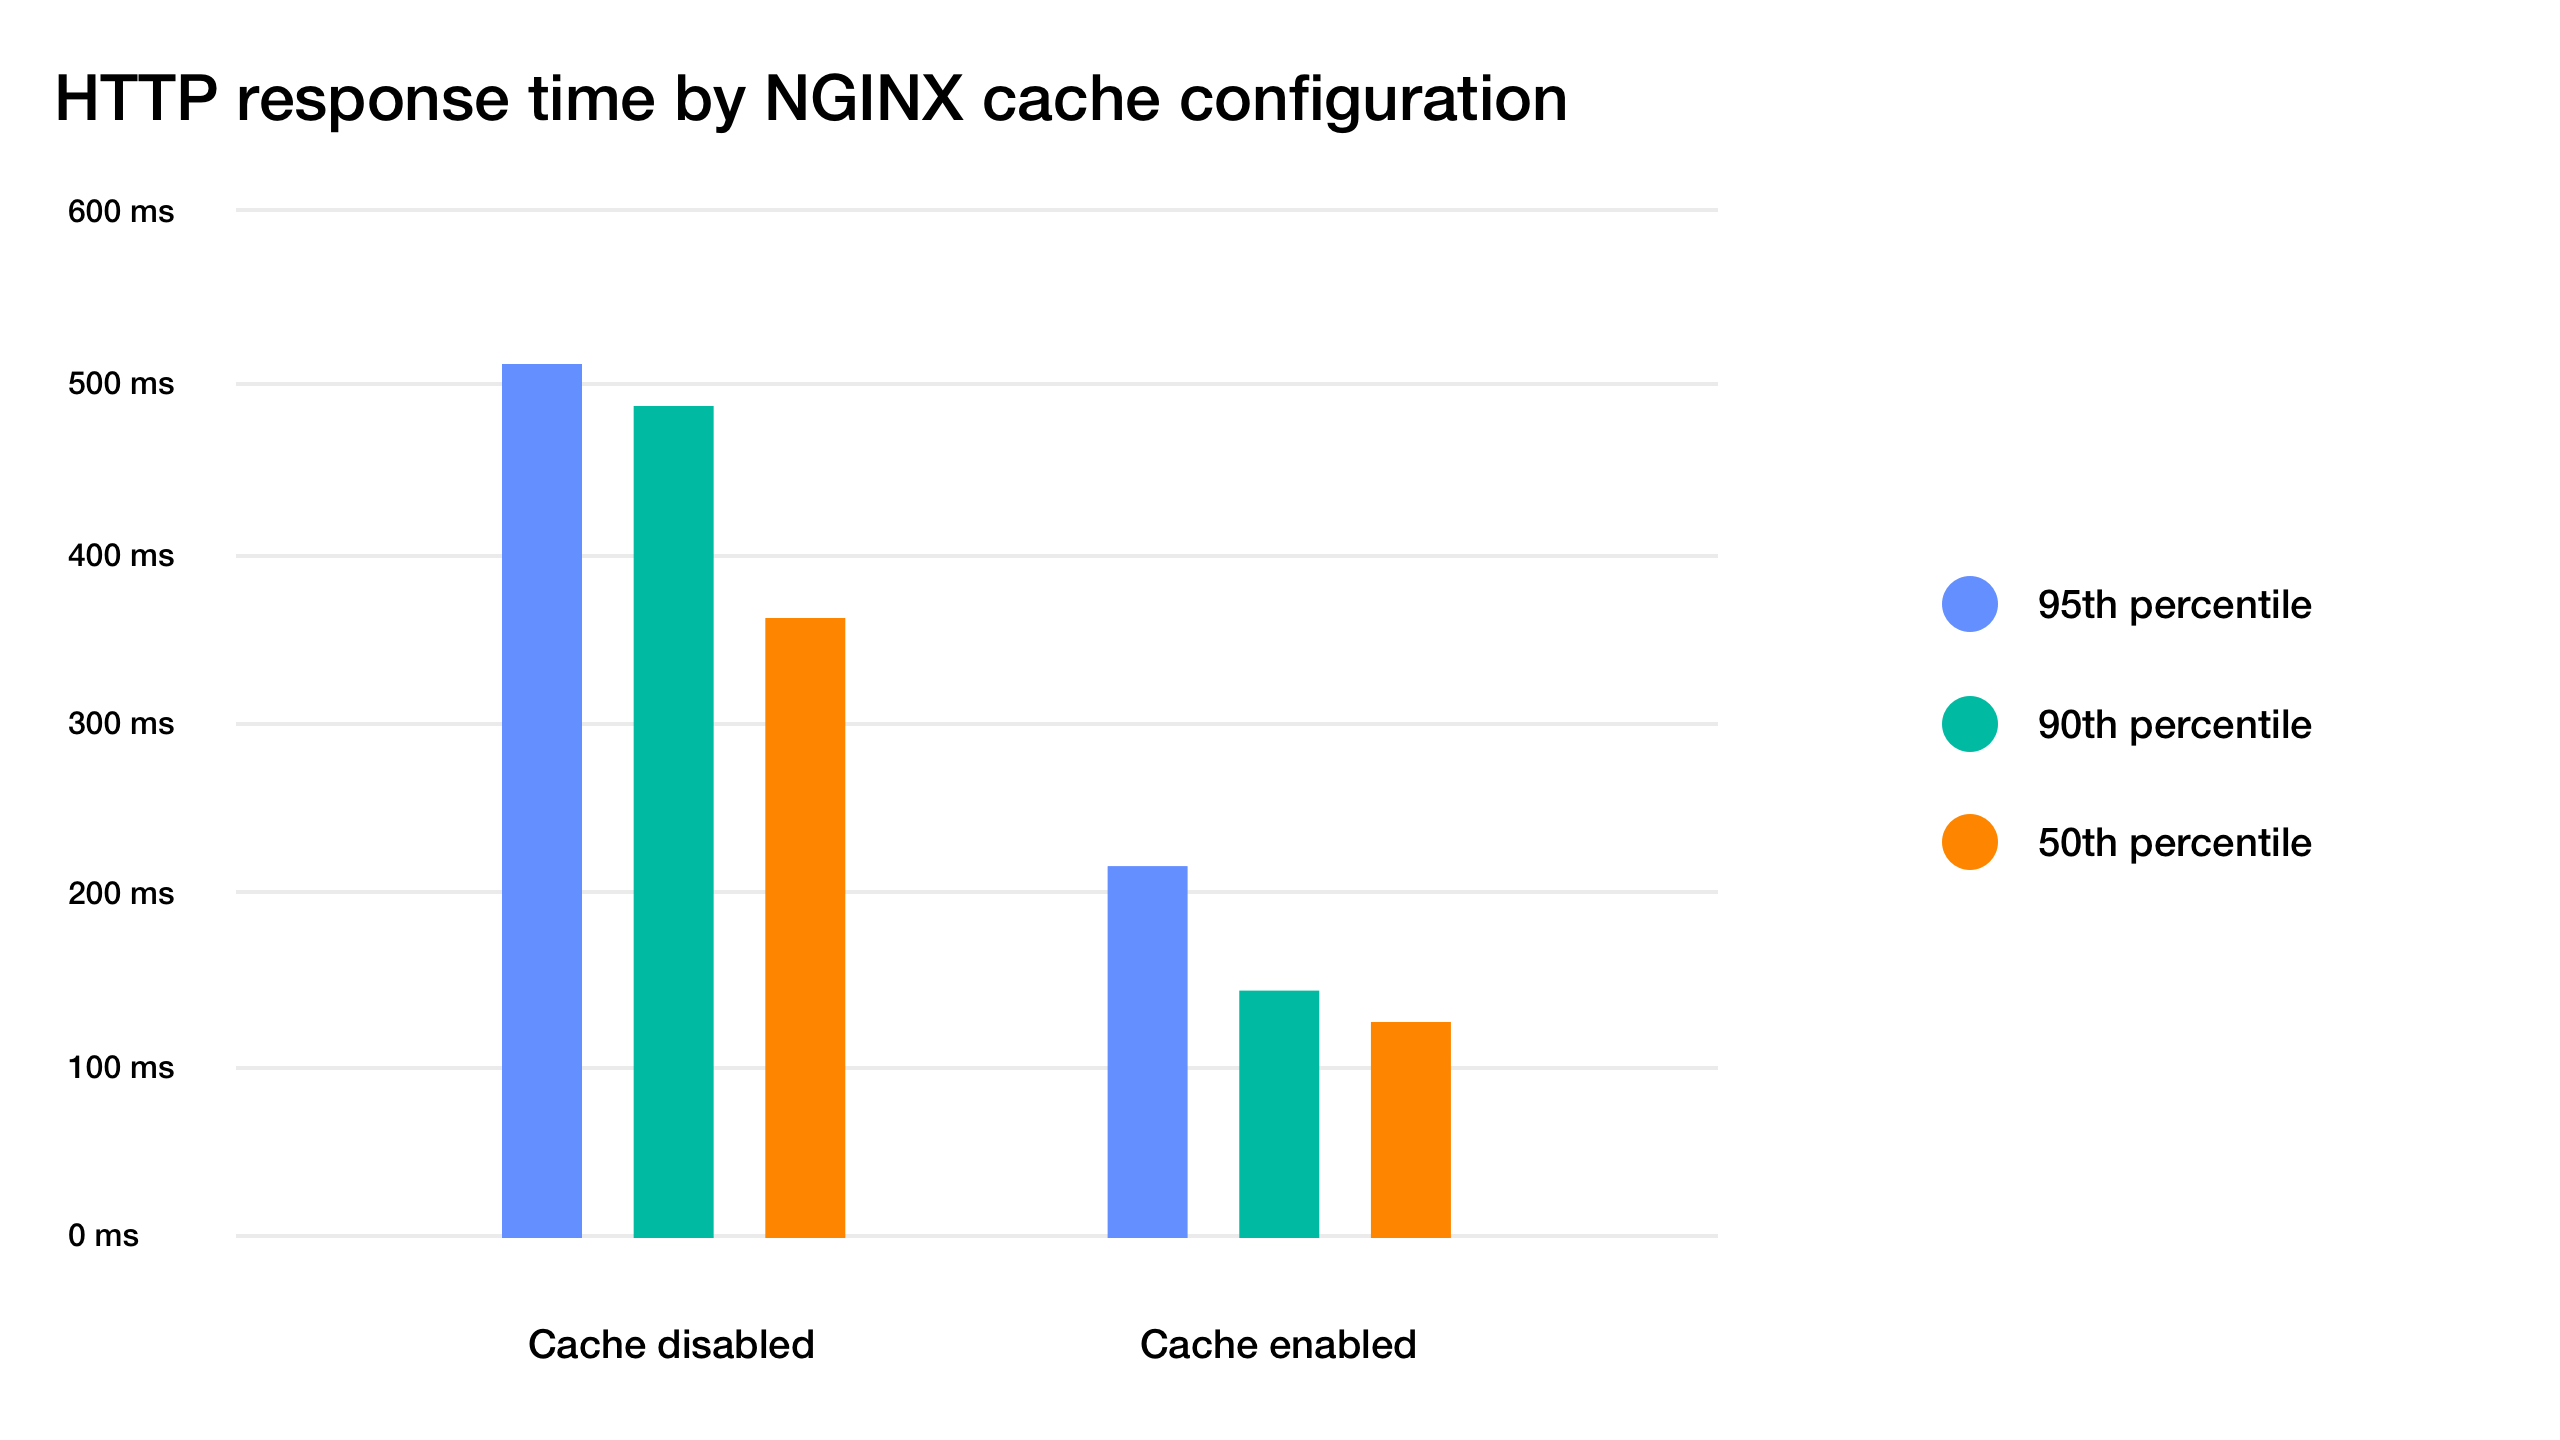
As you can see, the median (50 percentile) response is almost 3 times faster. However, the 95th percentile response time is considerably slower. This is because the second the cache expires, there are many requests to the backend which are slow to process compared to the serving the from the cache. This is called a cache MISS, in comparison to a cache HIT when the request is served from the cache.
To prevent this, we can add the following lines to the configuration that instruct Nginx to lock that cache so that only one request is made to the backend and the rest of the request are served using the the cache.
fastcgi_cache_lock on;
fastcgi_cache_valid any 1s;
fastcgi_cache_use_stale updating;
Here are the results:
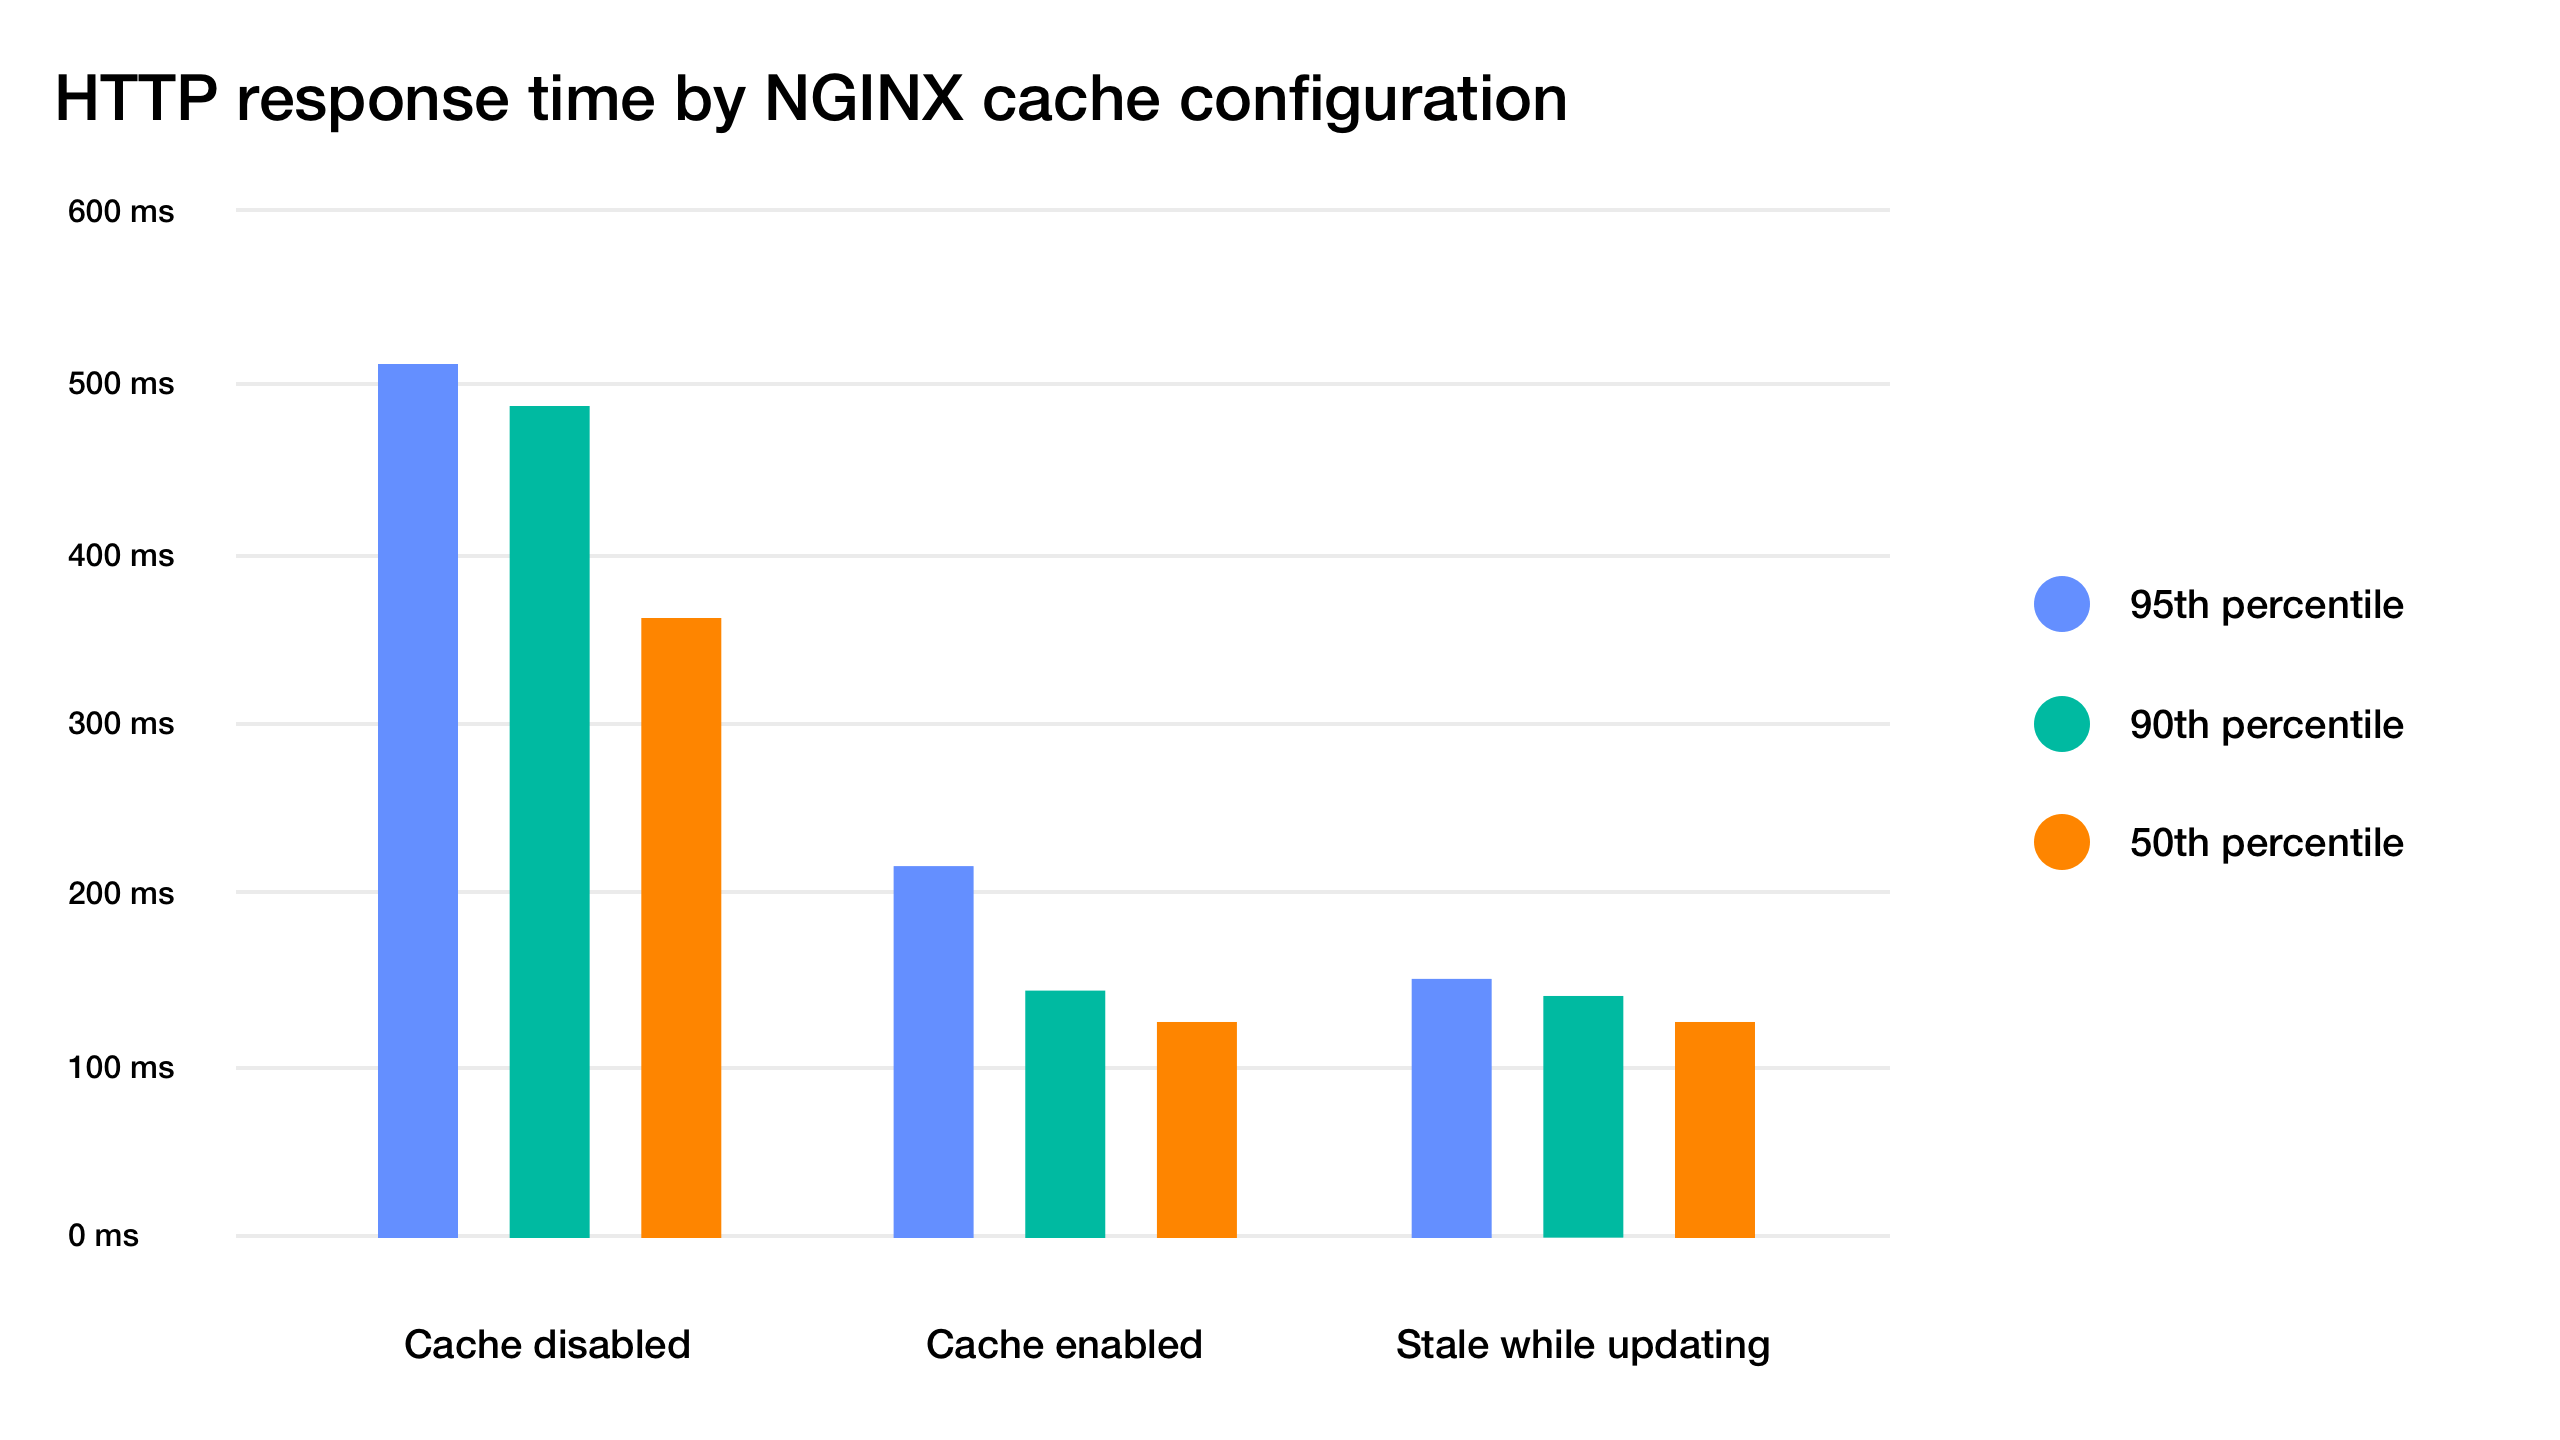
As we can see, it’s a big improvement comparing to just having the cache enabled.
But what about the first request that is made to the backend server? While other requests are served stale content from the cache, the first request after the cache expires is still slow because it’s blocked by the backend processing. We can make one last configuration change to prevent that by using stale while revalidate strategy.
This means that when the cache expires, stale documents are served from the cache for all subsequent requests and the cache is updated in the background. When the cache has been updated, the requests are served relatively fresh content from the cache. This way none of the request to the server actually reach the backend, ensuring the best possible performance.
Please note that fastcgi_cache_background_update is only supported in Nginx version 1.11.10, so if your server setup is old, you should look into updating it to the latest version to take advantage of this setting.
fastcgi_cache_lock on;
fastcgi_cache_valid any 1s;
fastcgi_cache_use_stale updating;
fastcgi_cache_background_update on;
Here’s how these settings compare to your previous setups:

Now all of the requests are served from the cache: none of the request actually reach the backend server. The content is still relatively fresh, after one second the next request will be fresh after the backend processing is complete. As you can see in the graph, almost all of the requests are equally fast. In the end, it’s a small optimization but if the page generation takes a lot of time, it can remove any outliers.
Please note that even if you are using a CDN for locating static content close to your users, you can benefit from microcaching because most CDN’s don’t cache HTML documents, only static assets like images, stylesheets and JavaScript files.
So, are there any downsides using full page caching?
Full page caching only works for static website websites that don’t have any content specific to a particular user. As soon as your website has a login page and the user’s name in the top right corner, caching becomes almost impossible because you would need a separate cache for every single user. The easy-but-less-performant fix is simply to disable caching for logged in users based on for example a cookie.
If you want to have the same performance benefits for logged in users, you could look into having the content that is same for all users served from full page cache and then use a JavaScript framework like Vue or React to render the user-specific parts of the user interface, client-side using a REST API to fetch the data.
For reference, here is the final configuration used for the test:
# Ignore cache control headers from upstream, don't enable this if you plan to control caching per-page from your application
fastcgi_ignore_headers Cache-Control Expires Set-Cookie;
# Specify cache path, cache memory zone, how long until old data gets purged from the cache and maximum cache size
fastcgi_cache_path /etc/nginx/cache levels=1:2 keys_zone=microcache:100m inactive=1y max_size=100m;
# A key that is used to uniquely identify a cached page
fastcgi_cache_key "$scheme://$host$request_method$request_uri";

server {
    listen 80 default_server;
    listen [::]:80 default_server ipv6only=on;

    root /var/www/html;
    index index.php index.html index.htm;

    server_name example.com;

    location / {
        #try_files $uri $uri/ =404;
        try_files $uri $uri/ /index.php$is_args$args;
    }

    error_page 404 /404.html;
    error_page 500 502 503 504 /50x.html;
    location = /50x.html {
        root /usr/share/nginx/html;
    }

    location ~ \.php$ {
    include snippets/fastcgi-php.conf;
    fastcgi_pass unix:/run/php/php7.0-fpm.sock;
    }

    # WordPress specific settings, don't cache logged in users or admin pages
    set $no_cache 0;

    if ( $http_cookie ~* "comment_author_|wordpress_(?!test_cookie)|wp-postpass_" ) {
        set $no_cache 1;
    }

    if ($request_uri ~* "/(wp-admin/|wp-login.php)")
    {
        set $no_cache 1;
    }

    # Don't cache or serve pages specified above
    fastcgi_cache_bypass $no_cache;
    fastcgi_no_cache $no_cache;

    # Select which cache to use
    fastcgi_cache microcache;
    # Cache successful responses for one second, you could also cache redirects here by adding status code 302!
    fastcgi_cache_valid any 1s;
    fastcgi_cache_lock on;
    fastcgi_cache_use_stale updating;
    fastcgi_cache_background_update on;
    # Show cache status in HTTP headers, useful for debugging
    add_header X-Cache $upstream_cache_status;
}
Try it out and see if you can speed up your site!
Update 17-05-2018
I have ran into an issue where using fastcgi_cache_use_stale with fastcgi_cache_background_update can cause issues with 404 pages. If you ever delete a page that has been cached, nginx will keep serving the cached page even if your origin server responds with 404.
It’s because WordPress adds Cache-Control: no-cache, must-revalidate, max-age=0 and expires: Wed, 11 Jan 1984 05:00:00 GMT to 404 pages which nginx will refuse to cache.
That’s why you should use any value in fastcgi_cache_valid and always use fastcgi_ignore_headers Cache-Control Expires. This way your deleted pages will properly return 404 error code. I have updated the code samples to reflect this.