I don’t recommend using DigitalOcean App Platform for hosting WordPress or other PHP apps due to its serious performance issues. Please see this more recent blog post for more details.
Since I moved my blog to the DigitalOcean app platform, here’s a couple of tips and tricks I learned along the way. This is a follow up to my earlier post on how to install WordPress on DigitalOcean App Platform.
Building a WordPress theme with Composer and NPM
DigitalOcean uses Heroku buildpacks to automatically detect the languages in your apps. For our WordPress site, it detects PHP correctly but often we need to have Node and NPM in order to build front-end themes.
The App Platform will not be able to detect the package.json if it’s located in your theme folder. The only way I’ve found it possible to load Node/NPM is to add an empty package.json file in the root of the repository.
The following package.json should work
{
  "name": "wordpress-on-do-apps"
}
And the following for package-lock.json
{
  "name": "wordpress-on-do-apps",
  "lockfileVersion": 1
}
Now when you deploy the site, Node buildpack will be loaded. You can then enter the following build command in the DO Apps admin panel to build your theme:
cd web/app/themes/my-theme
/workspace/.heroku/php/bin/php /workspace/.heroku/php/bin/composer install
npm install
npx webpack -p
It works but it’s a bit hacky. If anyone knows a better way to tell the App Platform to use Node buildpack, let me know in the comments.
Increasing PHP memory limit
By default, the App Platform buildpack allocates 128 MB of RAM per PHP request. This may not be enough for larger sites with a lot of plugins, for example, WooCommerce recommends 256 MB of memory.
Create a file called .user.ini in the web document root folder with the following content:
memory_limit = 256M
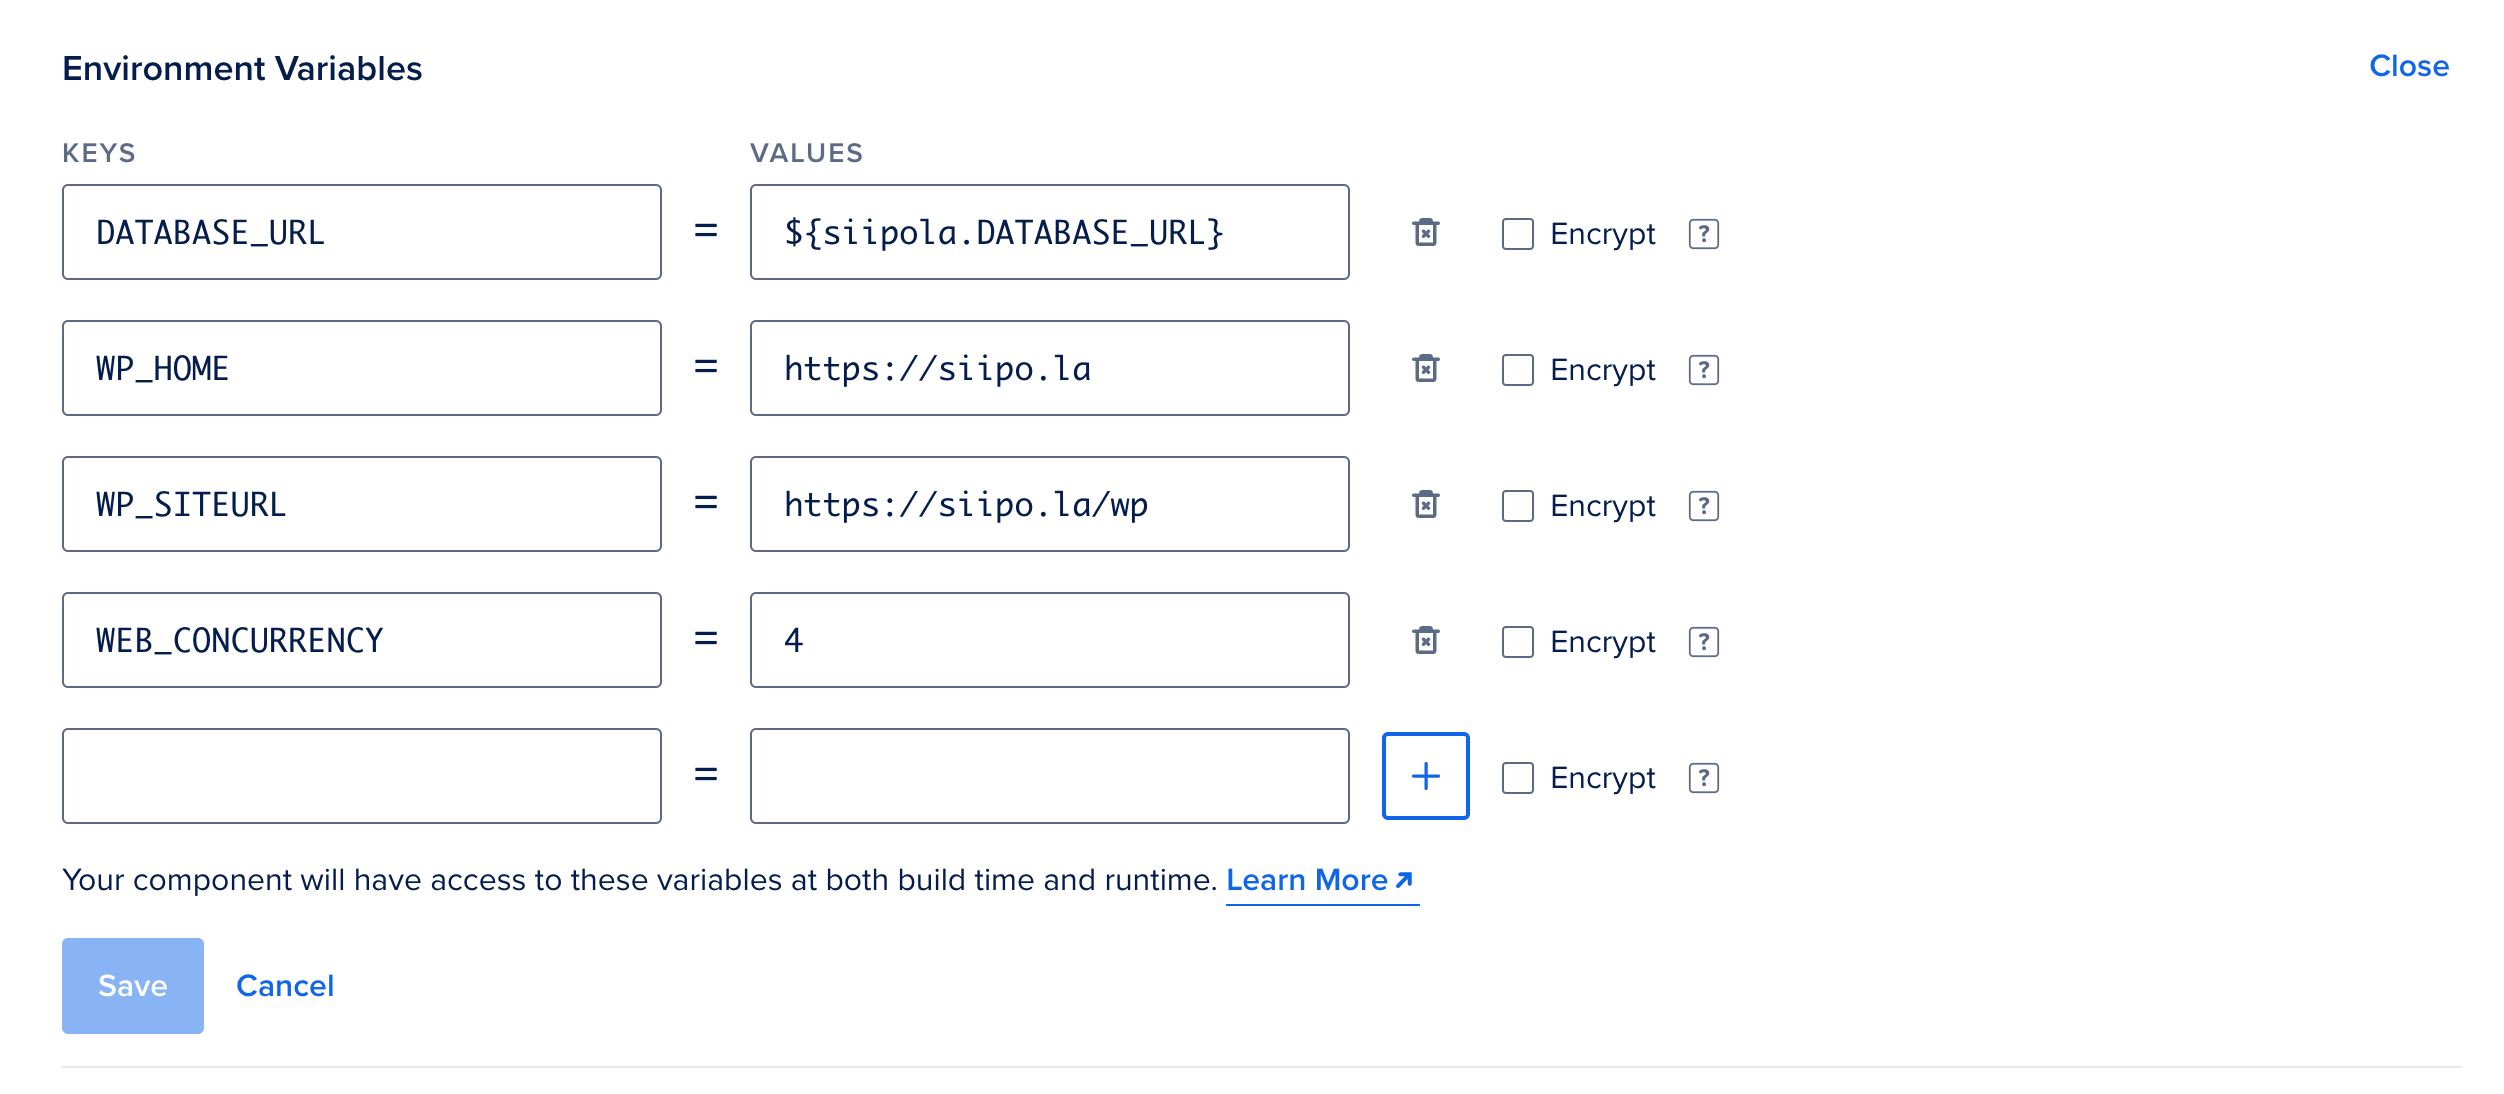
Increasing the number of workers
At the moment, there appears to be a bug in the App Platform where number of workers doesn’t scale with the container size. Even if you select the largest possible container, the following will be printed in the console:
app-name | 19:57:00 DOCUMENT_ROOT changed to 'web/'
app-name | 19:57:02 Using Nginx server-level configuration include 'nginx.conf'
app-name | 19:57:03 Assuming 512MB of RAM
app-name | 19:57:04 PHP memory_limit is 128M Bytes
app-name | 19:57:04 Starting php-fpm with 4 workers...
app-name | 19:57:06 Starting nginx...
app-name | 19:57:07 Application ready for connections on port 8080.
This means only 4 workers will ever be started regardless of the container size. You can fix this by defining the WEB_CONCURRENCY variable. Heroku documentation recommends you divide the total container RAM by PHP memory limit, for example, if you have 256 MB PHP memory limit and 1 GB container size, set the WEB_CONCURRENCY to 4.
HTTP level Nginx config
By default the Nginx configuration is a server level configuration include. But I wanted to use a few HTTP level configuration variables to enable FastCGI microcaching. It turns out it’s pretty easy to do, just copy the full configuration file from here, change the dynamic variables to static variables according to your environment and paste your config include in the right place. Here’s an example of such configuration:
http {
    include mime.types;
    default_type application/octet-stream;

    sendfile on;
    keepalive_timeout 65;

    server_tokens off;

    fastcgi_buffers 256 4k;

    # define an easy to reference name that can be used in fastgi_pass
    upstream heroku-fcgi {
        server unix:/tmp/heroku.fcgi.8080.sock max_fails=3 fail_timeout=3s;
        keepalive 16;
    }

    server {
        # define an easy to reference name that can be used in try_files
        location @heroku-fcgi {
            include fastcgi_params;

            fastcgi_split_path_info ^(.+\.php)(/.*)$;
            fastcgi_param SCRIPT_FILENAME $document_root$fastcgi_script_name;
            # try_files resets $fastcgi_path_info, see http://trac.nginx.org/nginx/ticket/321, so we use the if instead
            fastcgi_param PATH_INFO $fastcgi_path_info if_not_empty;
            # pass actual request host instead of localhost
            fastcgi_param SERVER_NAME $host;

            if (!-f $document_root$fastcgi_script_name) {
                # check if the script exists
                # otherwise, /foo.jpg/bar.php would get passed to FPM, which wouldn't run it as it's not in the list of allowed extensions, but this check is a good idea anyway, just in case
                return 404;
            }

            fastcgi_pass heroku-fcgi;
        }

        server_name localhost;
        listen 8080;
        # FIXME: breaks redirects with foreman
        port_in_redirect off;

        # Your document root here
        root "/Users/joppuyo/Documents/Projects/siipola/app/public/web";

        error_log stderr;
        access_log /tmp/heroku.nginx_access.8080.log;

        # Your custom config start
        client_max_body_size 100M;
        index index.php index.html;
        fastcgi_buffers 4 256k;
        fastcgi_buffer_size 128k;

        location / {
            try_files $uri $uri/ /index.php?$args;
        }
        # Your custom config end

        # restrict access to hidden files, just in case
        location ~ /\. {
            deny all;
        }

        # default handling of .php
        location ~ \.php {
            try_files @heroku-fcgi @heroku-fcgi;
        }
    }
}
Then change your run command from:
heroku-php-nginx -C nginx.conf web/
To
heroku-php-nginx -c nginx.conf
Notice the lower case c instead of upper case C.
Speed up Nginx requests
I’m not 100% sure what’s causing this but sometimes several concurrent requests to the application start to slow down and hang the connection. I suspect this might have something to do with slow disk performance and the disk cache used by Nginx. This will cause built-in Cloudflare CDN to spit out cryptic errors like ERR_INCOMPLETE_CHUNKED_ENCODING or ERR_SPDY_PROTOCOL_ERROR
Following Nginx configration helped me to fix this:
fastcgi_buffers 4 256k;
fastcgi_buffer_size 128k;
This will dissuade Nginx from writing requests to disk and prevent slowdown. Configuration copied from here.
I’ve chatted with DigitalOcean support about the performance issues with Nginx and they are aware of the problem. It’s apparently a compatibility issue with nginx and gVisor virtualization they are using. They are tracking the problem internally and suggest using Apache instead of Nginx in the meantime. For more information about the gVisor performance issues, see this blog post.
Send email from WordPress
While it’s not a critical function, it’s often important to send emails from WordPress, for example for password resets or contact form submission notifications.
You can’t send email from the DigitalOcean App Platform and sending email straight from the server isn’t usually recommended anyway since they will often end up in the spam folder unless you set up SPF or DKIM records. Since App Platform doesn’t have a static IP this gets pretty tricky.
I recommend using Email Service Provider (ESP) like SendGrid, Mailgun, or Amazon Simple Email Service (SES). On the WordPress side, I can recommend WP Mail SMTP plugin to send emails via ESP rather straight from the server.
Set up an account on SendGrid, generate API key and enter that key in the WP Mail SMTP options. I recommend going through the SendGrid process to set up SPF and DKIM records for better deliverability.
Cron and scheduled events
DigitalOcean App Platform does not support Cron at the moment. This may be added in a future version. WordPress relies on Cron in order to publish scheduled posts and perform maintenance tasks like checking new versions of plugins.
First I thought of using another container with WP CLI to run Cron periodically. Then I realized the problem with this is that even if that container has access to the same codebase and database as the container running the site, the file system is different. If the Cron task cleans temporary files or something, it will be cleaning the wrong file system.
Therefore I recommend creating another container and simply call the https://mysite.com/wp/wp-cron.php file directly using cURL.
- Create a new component in the DO Apps dashboard and select Worker as the component type.
- Select the same Git repository as the site (the repository doesn’t really matter that much since we are not actually running the code)
- As the run command, enter
while true; do curl https://mysite.com/wp/wp-cron.php; sleep 60; done - Congratulations, you have a Cron running!
The downside with this is that you end up paying for an extra $5 or $12 / mo container doing very little.
On the other hand, if you have a monitoring service like Pingdom that pings your site every minute, you can just rely on WordPress’ built-in poor person’s Cron where the Cron will be run on a page load. Note that contrary to popular belief, this will not slow down your page load speed while executing the Cron. When the Cron is due, WordPress will make a loopback request to itself using cURL and the slow Cron request is ran in the background.
That’s it. I hope these tips and tricks help you on your way to run WordPress on the DigitalOcean App Platform.
Last updated on 2021-04-06:
Added a response from DigitalOcean about the performance issues with Nginx.